To develop android application in windows, there are some necessary programs that needed to be installed. Android use java as development language, so in order to develop android application, the following programs need to be installed:
2) Eclipse (which is recommended by Android or other java application)
3) Android SDK
For windows 32 bit xp, vista and 7, it is recommended to use Eclipse 3.5 Galileo 32 bit which consider as a stable version of eclipse to work with Android.
Eclipse 3.6 Helios 64 bit can be used for those who use 64 bit windows but Android development say that Eclipse 3.6 Helios might has problems with Android Plug-in.
Installation
JDK will needed an installation. Just follow the instructions after running JDK installer.
Eclipse and Android SDK from the link that I provided above are in zip files which can directly work after extracting the files into any directory of your preferences.

Eclipse Galileo Start-up picture. The workspace can be any directory that you prefer. After that, Eclipse will start loading. When finish loading, click Help --> Install New Software...

Since I had install Android plug-in in Eclipse, just ignore the duplicate location here. You won't have this notification if you just download the Eclipse.
The location that I had inserted in the picture is "https://dl-ssl.google.com/android/eclipse/" and the name can be anything of your choice. Then click OK. Please ignore the picture with the disable OK button.

After that, there will be two developers tools for android. Just check for both and click next and follow the instruction until you finish with the installation. Restart eclipse after that.
Now, we will integrate Android SDK into Eclipse. After Eclipse start-up, click Window --> Preferences.
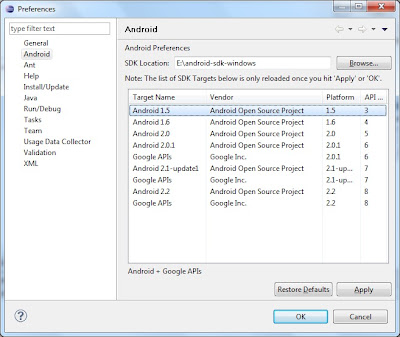

Click on Android and the choose the directory where you previously extracted Android SDK folder by clicking on Browse. Click OK.
Now, go to Window--> Android SDK and AVD Manager. Click on Available Packages and check the check box there.

The available packages will be shown after updating from internet. You can check all or just choose the minimum: one SDK platform in order to develop Android apps. If you don't know how to choose, please refer here.
Once you have chosen the package, click Install Selected. It will take times to install depends on your internet speed.
You are almost done but you will need to prepare your virtual device for testing your apps once you created.
Back to Android SDK and AVD Manager, and choose Virtual Devices and the click New.
 Choose your own setting for your virtual device and you are done with setting up. Now you may start with programming your own android application.
 To do so, Click File --> New --> Other --> Android --> Android Project and start your very own development.
Hope this tutorial had guide you in setting up your computer for Android Development.
No comments:
Post a Comment